

Recently I needed to build a multipurpose file server to host CIFS and NFS shares — CIFS for the Windows users, and NFS for VMWare to store ISOs. It needed to utilize back end storage (NetApp via iSCSI), provide Windows ACLs for the CIFS shares, and be able to authenticate against two different Active Directory domains. After careful consideration, I decided to use Red Hat Enterprise Linux 6.5 (RHEL) instead of Windows Server 2012.
Now you might be wondering, “Why on earth would you want to build a Linux file server to do all that when you can just use Windows?” There are a few reasons:
Resources – Linux has a much, much smaller footprint than even a Server Core install of Windows Server 2012. If you’re building a file server for a branch office with limited server resources, this can be a big deal.
Security – Yes, Red Hat Linux really is more secure out-of-the-box than Windows, plus it’s less of a target — at least for now.
Cost… maybe – The cost of Linux vs. Windows is a funny thing. Obviously, Linux is free and Windows isn’t. But if you purchase enterprise Linux support from, say, Red Hat, the cost comes out nominally less for Linux. On the other hand, if your organization doesn’t require enterprise-level support on every server, building redundant Linux file servers is free. The cost is ultimately dependent upon the level of support needed.
In this post I’m going to show you how I built a fully-functional, Active Directory-friendly Linux file server in less than half-a-day.
Install Red Hat#
The first step, of course, is to install Linux. I created a VMWare virtual machine with 4GB RAM and 1 vCPU. Having decided to go with RHEL 6.5, I first created a Kickstart script with the following packages:
@base
@console-internet
@network-tools
@core
@directory-client
@internet-browser
@large-systems
@network-file-system-client
@performance
@server-platform
(Kickstart is the name of Red Hat’s automated installation method. If you don’t want to use Kickstart, you can just install RHEL 6.5 the old fashioned way and select the above package groups when prompted)
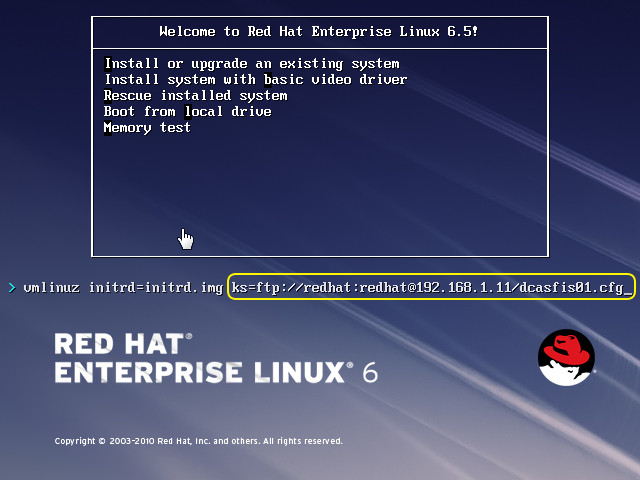
I placed the Kickstart file and the Red Hat installation files on an FTP server, booted the RHEL ISO, and pointed the bootloader to the Kickstart file as shown here:
Setup the Red Hat Repositories#
After the installation is complete, you’ll need to ensure yum, Red Hat’s package installer, knows where to find the Red Hat installation files as you be installing more things shortly. Log in as root and edit the file /etc/yum.repos.d/rhel-source.repo. Add the text enclosed in the yellow rectangle below, changing the path as necessary to suit your environment, then save it.
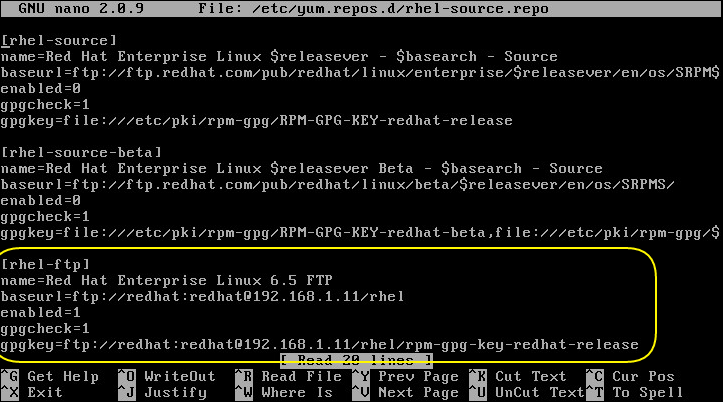
In the example above, I’m logging into the FTP server at 192.168.1.11 with the username and password “redhat”. Alternatively, you can just mount the Red Hat ISO into /media with the command
mount -o loop /dev/cdrom /mediaand point the baseurl path to file:///media.
Become Active Directory friendly#
Now we’re going to install Samba4, Winbind, Kerberos, NTP, and NFS.
yum -y install samba4 samba4-client samba4-winbind krb5-workstation ntp nfsConfigure your NTP servers (typically your AD domain controllers) in /etc/ntp.conf, start the NTP daemon, and set it to start at bootup.
chkconfig ntpd
service ntpd start
Next, since we’ll be dealing with the ever-picky Active Directory, we’ll need to ensure DNS is configured properly. Modify /etc/resolv.conf to add your DNS servers and any DNS suffixes you want Linux to search when it tries to look up a non-fully qualified domain name (For example, if I try to ping webserver01, I want Linux to perform a DNS lookup for webserv01.benpiper.com, so I’d add the suffix benpiper.com to the search space.)
Now configure /etc/hosts and put this server’s fully-qualified domain name (FQDN) right after 127.0.0.1.
Configure Samba to use Winbind, Kerberos, and NTFS ACLs#
Next we need to modify /etc/samba/smb.conf. Under the [config] section we need to add or change the following lines:
workgroup = BENPIPER
server string = FILE SERVER SAMBA V %v
netbios name = DCASFIS01
security = ADS
realm = BENPIPER.COM
encrypt passwords = yes

winbind trusted domains only = no
winbind use default domain = yes
winbind enum users  = yes
winbind enum groups = yes

idmap uid = 15000-20000
idmap gid = 15000-20000

vfs objects = acl_xattr
map acl inherit = Yes
nt acl support = yes
store dos attributes = Yes
A little explanation is in order. The workgroup directive is the NetBIOS name of the domain the server is going to join.
netbios name is the NetBIOS name of the server that’s going to be joining the domain.
realm is the Kerberos realm which we are going to specify when we configure Kerberos. A common misconception is that the Kereros realm is just the FQDN of the domain. Even though we’ll be using the FQDN for clarity, this could actually be any value we want, as long as it matches what we specify later on /etc/krb5.conf.
nt acl support = yes tells Samba to store NTFS Access Control Lists (ACLs) as Linux File Access Control Lists.
Integrate with Active Directory#
Join the domain. Be sure to replace <em>domainadmin</em> with an actual domain adminsitrator.
net ads join -U domainadminSamba’s name service switch module sits in the 32-bit /usr/local.samba/lib directory by default. Samba running on our 64-bit system is not going to look there, so we’ll need to create a symbolic link to the /lib64 directory.
ln -s /usr/local/samba/lib/libnss_winbind.so /lib64
ldconfig
Add the following to /etc/nsswitch.conf
passwd: compat winbind
group: compat winbind
Modify /etc/krb5.conf as follows.
[logging]
default = FILE:/var/log/krb5libs.log
kdc = FILE:/var/log/krb5kdc.log
admin_server = FILE:/var/log/kadmind.log

[libdefaults]
default_realm = BENPIPER.COM
dns_lookup_realm = true
dns_lookup_kdc = true
ticket_lifetime = 24h
renew_lifetime = 7d
forwardable = true

[realms]
BENPIPER.COM = {
}

SECONDARYDOMAIN.COM = {
}

[domain_realm]
.benpiper.com = BENPIPER.COM
benpiper.com = BENPIPER.COM
.secondarydomain.com = SECONDARYDOMAIN.COM
secondarydomain.com = SECONDARYDOMAIN.COM
Start winbind, smb, and nmb.
service winbind start
service smb start
service nmb start
chkconfig winbind on
chkconfig smb on
chkconfig nmb on
Create a test CIFS share#
Now we’re ready to test whether CIFS sharing actually works. Create a test folder to share via CIFS.
mkdir /var/lib/samba/testshareGrant rwx permissions to the directory owner and group.
chmod 770 /var/lib/samba/testshare/Give ownership to user “root” and Active Directory group BENPIPER\file server admins. This will ensure both “root” and members of the “file server admins” group can modify ACLs. Note that
chown root:"BENPIPER\file server admins" /var/lib/samba/testshare/Modify the ACL to grant the BENPIPER\file server admins AD group read, write, and execute access to the new folder.
setfacl -m g:"BENPIPER\file server admins":rwx /var/lib/samba/testshare/
setfacl -m g::--- /var/lib/samba/testshare
Now try to access the share from a Windows machine. If you are a member of the BENPIPER\file server admins group, you should be able to modify ACLs directly from Windows Explorer.
iSCSI setup#
If you’re not going to be using shared storage, you can skip this section. Here we’re going to configure an iSCSI connection to our NetApp SAN. We’ve already created a 200 GB LUN and made it available to the iQN initiator name that we’ll set in just a moment.
First, install the iSCSI initiator utilities.
yum -y install iscsi-initiator-utilsChange the initiator name in /etc/iscsi/initiatorname.iscsi to whatever you want. I usually use the hostname for the storage identifier (for example, iqn.1994-05.com.benpiper:dcasfis01)
If you don’t want iSCSI traffic to ride over a separate NIC, skip this step. Assuming iSCSI traffic will use eth1, modify /var/lib/iscsi/ifaces/iface.eth1 as follows:
iface.transport_name = tcp
iface.iscsi_ifacename = eth1
Run discovery against the NetApp SAN with IP 192.168.59.31 and login.
iscsiadm -m discovery -t st -p 192.168.59.31
iscsiadm -m node -l
Now verify. You should see the IP addresses, ports, and iQN of the SAN.
# iscsiadm -m node
192.168.59.31:3260,2001 iqn.1992-08.com.netapp:sn.437593081
192.168.60.31:3260,2001 iqn.1992-08.com.netapp:sn.437593081
Rescan the session to pick up the LUNs.
iscsiadm -m node -RVerify the new storage is there. Note the name of the disk (/dev/sdb).
# fdisk -l
...
Disk /dev/sdb: 214.7 GB, 214748364800 bytes
255 heads, 63 sectors/track, 26108 cylinders
Units = cylinders of 16065 * 512 = 8225280 bytes
Sector size (logical/physical): 512 bytes / 512 bytes
I/O size (minimum/optimal): 4096 bytes / 65536 bytes
Disk identifier: 0x00000000
...
Create an LVM Volume#
We’re going to use the Linux Logical Volume Manager (LVM) to partition the block storage. The advantage of using LVM over using fdisk to create MBR partitions is that resizing LVM volumes is much easier. If you don’t know your storage requirements up front, you can create relatively small logical volumes and leave the rest of the disk unallocated. When you have a better idea of what size the volumes should be (like when you run out of space), you can non-destructively resize them.
Creating an initial LVM volume requires a few steps. We’ll still have to use fdisk to create a primary partition, but instead of creating it as ext4 partition type, we’ll select Linux LVM (type 8e). Then we’ll create a physical LVM volume on the partition, followed by a logical volume group, and finally a logical volume.
Create a primary partition for the Linux Logical Volume Manager (LVM).
# fdisk /dev/sdb

WARNING: DOS-compatible mode is deprecated. It`s strongly recommended to
switch off the mode (command 'c') and change display units to
sectors (command 'u').

Command (m for help): n
Command action
e extended
p primary partition (1-4)
p
Partition number (1-4): 1
First cylinder (1-26108, default 1):
Using default value 1
Last cylinder, +cylinders or +size{K,M,G} (1-26108, default 26108):
Using default value 26108

Command (m for help): t
Selected partition 1
Hex code (type L to list codes): 8e
Changed system type of partition 1 to 8e (Linux LVM)

Command (m for help): w
The partition table has been altered!

Calling ioctl() to re-read partition table.
Syncing disks.
Create the LVM physical volume on /dev/sdb1
# pvcreate /dev/sdb1
Physical volume "/dev/sdb1" successfully created
Create a volume group called volgroup1
# vgcreate volgroup1 /dev/sdb1
Volume group "volgroup1" successfully created
Now we’ll create a small 40GB volume for ISO storage. LVM sizes volumes based on the number of extents. When we created the logical volume group we didn’t select an extent size, so it used the default which is 4MB. The size of the logical volume must be an integer multiple of the extent size. Since we’re creating a 40GB volume and the extent size is 4MB, we’ll specify 10240 extents (40960MB / 4MB).
# lvcreate -l 10240 -n ISO volgroup1
Logical volume "ISO" created
Verify the new volume information is correct. Note the path of the new volume as this is what we’re going to be formatting.
# lvdisplay
--- Logical volume ---
LV Path /dev/volgroup1/ISO
LV Name ISO
VG Name volgroup1
LV UUID apui74-26k5-AcWK-VtaF-UTbY-DuKp-QsCXf1
LV Write Access read/write
LV Creation host, time dcasfis01.benpiper.com, 2014-07-07 00:00:00 -0000
LV Status available
# open 0
LV Size 40.00 GiB
Current LE 10240
Segments 1
Allocation inherit
Read ahead sectors auto
- currently set to 256
Block device 253:4
Create an ext3 filesystem.
# mkfs.ext3 /dev/volgroup1/ISO
mke2fs 1.41.12 (17-May-2010)
Discarding device blocks: done
Filesystem label=
OS type: Linux
Block size=4096 (log=2)
Fragment size=4096 (log=2)
Stride=1 blocks, Stripe width=16 blocks
2621440 inodes, 10485760 blocks
524288 blocks (5.00%) reserved for the super user
First data block=0
Maximum filesystem blocks=4294967296
320 block groups
32768 blocks per group, 32768 fragments per group
8192 inodes per group
Superblock backups stored on blocks:
32768, 98304, 163840, 229376, 294912, 819200, 884736, 1605632, 2654208,
4096000, 7962624

Writing inode tables: done
Creating journal (32768 blocks): done
Writing superblocks and filesystem accounting information: done

This filesystem will be automatically checked every 33 mounts or
180 days, whichever comes first. Use tune2fs -c or -i to override.
By default, Samba looks for shares in the /var/lib/samba folder, so we’ll create mount point for for our new ISO volume and then mount it there.
mkdir /var/lib/samba/iso
mount /dev/volgroup1/ISO /var/lib/samba/iso
In order to ensure that the volume is mounted when the system reboots, we need to add the volume’s UUID to /etc/fstab.
# blkid /dev/volgroup1/ISO
/dev/volgroup1/ISO: UUID="a8c77eb9-422a-4d8c-bec6-46cc811dc535" SEC_TYPE="ext2" TYPE="ext3"
Add the above UUID to /etc/fstab:
UUID=a8c77eb9-422a-4d8c-bec6-46cc811dc535 /var/lib/samba/iso ext3 _netdev,acl 0 0The _netdev directive indicates that this is an iSCSI-bound volume, and the acl directive indicates that the filesystem should be mounted with ACL support.
Now we’re ready to create a CIFS share for the new volume. Edit /etc/samba/smb.conf as follows:
[iso]
comment = ISO share
browseable = yes
writable = yes
path = /var/lib/samba/iso
inherit acls = yes
inherit permissions = yes
Reload the Samba config to apply the changes.
smbcontrol smbd reload-configSet the permissions on the new share to make root the user owner and BENPIPER\file server admins the group owner. Add BENPIPER\file server admins to the ACL and grant rwx access.
chmod 770 /var/lib/samba/iso/
chown root:"BENPIPER\file server admins" /var/lib/samba/iso/
setfacl -m g:"BENPIPER\file server admins":rwx /var/lib/samba/iso/
setfacl -m g::--- /var/lib/samba/iso/
Now it’s time to test. Go to a Windows machine and browse to the new share.
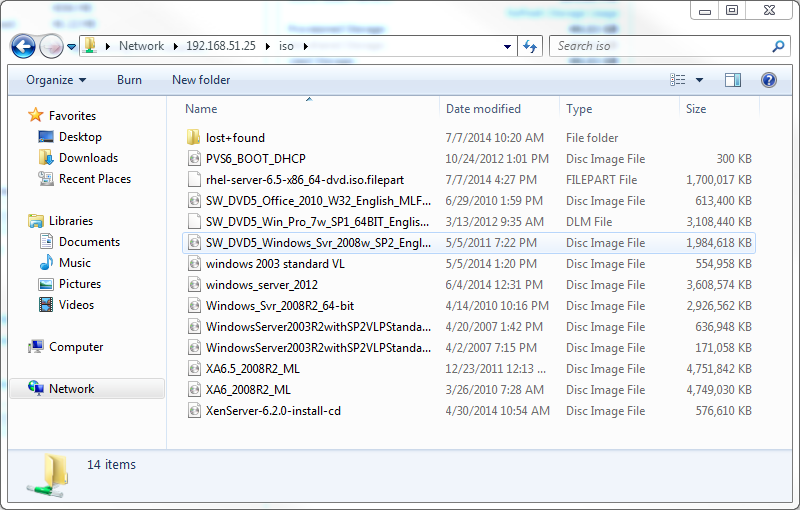
It works! But before we get too excited, let’s reboot. When the system comes back up, verify that the volume is still mounted in the right location.
# df -h
Filesystem                     Size  Used Avail Use% Mounted on
/dev/mapper/vg_dcasfis01-root   18G  1.5G   15G  10% /
tmpfs                          1.9G     0  1.9G   0% /dev/shm
/dev/sda1                      485M   39M  421M   9% /boot
/dev/mapper/vg_dcasfis01-home  9.9G  151M  9.2G   2% /home
/dev/mapper/vg_dcasfis01-var   7.9G  223M  7.3G   3% /var
/dev/mapper/volgroup1-ISO       40G  177M   38G   1% /var/lib/samba/iso
Looks good. Add some ISOs to the share for VMWare to use and let’s start configuring NFS.
Configure NFS#
Modify /etc/exports to share the volume as read-only.
/var/lib/samba/iso *(ro,sync)Start NFS and configure it to start at boot.
service nfs start
chkconfig nfs on
Grant others read-only access so VMWare can see the ISOs.
chmod o+r /var/lib/samba/isoNow mount the NFS volume in VMWare as read-only. The path is going to be /var/lib/samba/iso. Open the datastore browser and verify you can see the ISOs.
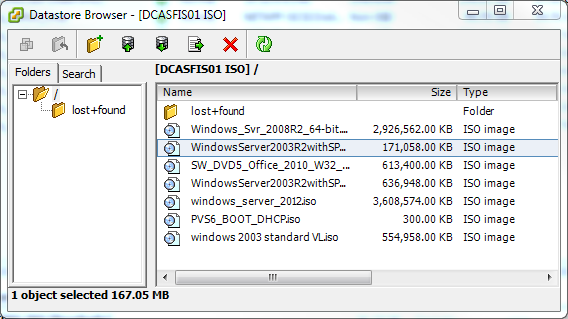
We’re done! If you’re feeling adventurous you can even install Apache or another webserver and give access to these ISOs via HTTP. This is perfect for providing images to OpenStack’s Glance or CloudStack’s Secondary Storage.
I hope you enjoyed this little tutorial. If you have any questions or comments please feel free to leave them below.